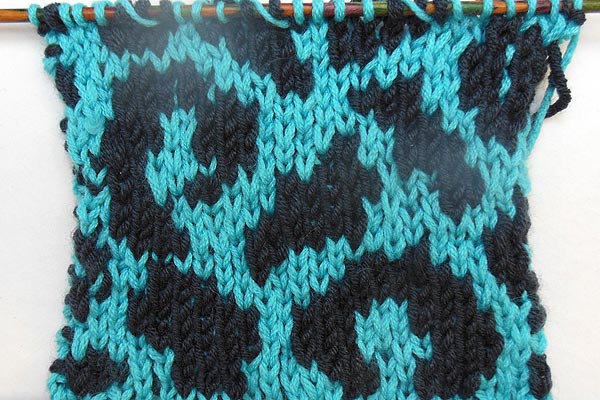
Believe it or not, I dreamed about this technique and I made it work. You will never color knit like before (means fiddling around with 2 or more threads of yarn). But see for your self, spread the word and tell me about your experience with this astonishing Fair Isle Technique.
Video #1 * Understanding the technique
There is a simple rule, where to place Yarnovers (YO). We need them to „weave“ in the other color during the next turn (every 2nd stitch actually). So therefore you slip groups of stitches of the „other“ color according the following rule::
1 stitch: NO YO, just slip
2 stitches: slip [YO slip]
3 stitches: slip [YO slip] slip
4 stitches: slip [YO slip] slip [YO slip]
5 stitches: slip [YO slip] slip [YO slip] slip
6 stitches: slip [YO slip] slip [YO slip] slip [YO slip]
7 stitches: slip [YO slip] slip [YO slip] slip [YO slip] slip
and so on…
Video #2 * Practicing by knitting along stitch-by-stitch
To prove that my new Fair Isle Technique works with practically every pattern, I made this video for you, where you may knit along with me stitch by stitch through a complete pattern repeat of a simple animal print (24 stitches by 24 rows).
While this special video is extraordinary long (more than 1 hour) you don’t need to watch it to the end actually. I am sure you get the principle after a few minutes. But if you like to knit along with me, I promise you have learned color knitting after this hour.
I chose a simple animal print for beginners as it forgives small errors. And if you are not ready yet to start with color knitting, then you may use this video instead of counting sheep >;o)
In addition to the video you may download two free animal print knitting charts:
PDF-Download * Free Knitting Chart „Leopard“
PDF-Download * Free Knitting Chart „Tiger“


14 Kommentare
Brilliant. Thank you so much for your videos!
[Reply]
Pingback: Color Knitting Practice * Fair Isle Pattern “Leopard” * Stitch by Stitch Video plus free Chart download
i really don’t know how u do it. thanks 😀
[Reply]
Your amazing! Thanks for sharing! Will try some day soon. THANK YOU
[Reply]
Genial!!!! Thank you very much for sharing. Greetings from Rome.
[Reply]
Oh boy, not so easy. I get really confused as to where I am and what is to be done next. I can’t tell when or if I need to slip or knit a set of colors. The purl row seams to be a bit easier to make that choice. Is there a rule of thumb when you look at the peice to tell what you are to do next?
[Reply]
Thank you so much for all your tutorials & vids, you are a wonderful crafts person to take the time to teach so many of us ! I am going to use the leopard pattern for fun socks…..Thanks !
[Reply]
This is amazing! Thanks so much for sharing it!
[Reply]
You’ve combined Brioche and Double Knitting basically! I agree, I don’t know why someone hadn’t figured it out; but it’s the first time I’ve seen the combination. Nice!
[Reply]
EliZZZa, do you have a video that demonstrates this technique in the round? I’m curious to see how you keep track of where you’re at. Love your website and your videos! Big help!
[Reply]
Please send leopard print pattern been looking every were
[Reply]
Patricia Boulogne Reply:
September 27th, 2013 at 19:02
Hi Joan,
At the bottom of the post, you will find two free downloadables Patterns in PDF format, including the Leopard print one. Just hover your mouse over the link, right click and select „save as“, to save the PDF to your computer. Happy knitting!
[Reply]
1. The floating contrasting color shows behind the main color on longer floats, such as over more than 6 stitches. How can I correct this.
2. How is a 3rd or 4th color added without the back of the work getting excessively bulky and the front of the work getting very confusing with massive numbers of yarn overs?
[Reply]
You are, indeed, brilliant and so wonderful to share your technique. I look forward to seeing you work with more than one color.
[Reply]